Beginner’s guide · Research & collect
Prove the camera dry,
then replace only the failed seal.
A common mechanical film camera can be documented, gently cleaned, exercised and light-sealed before one controlled test roll.
Quick answer
Complete one light-sealed test camera before expanding the setup
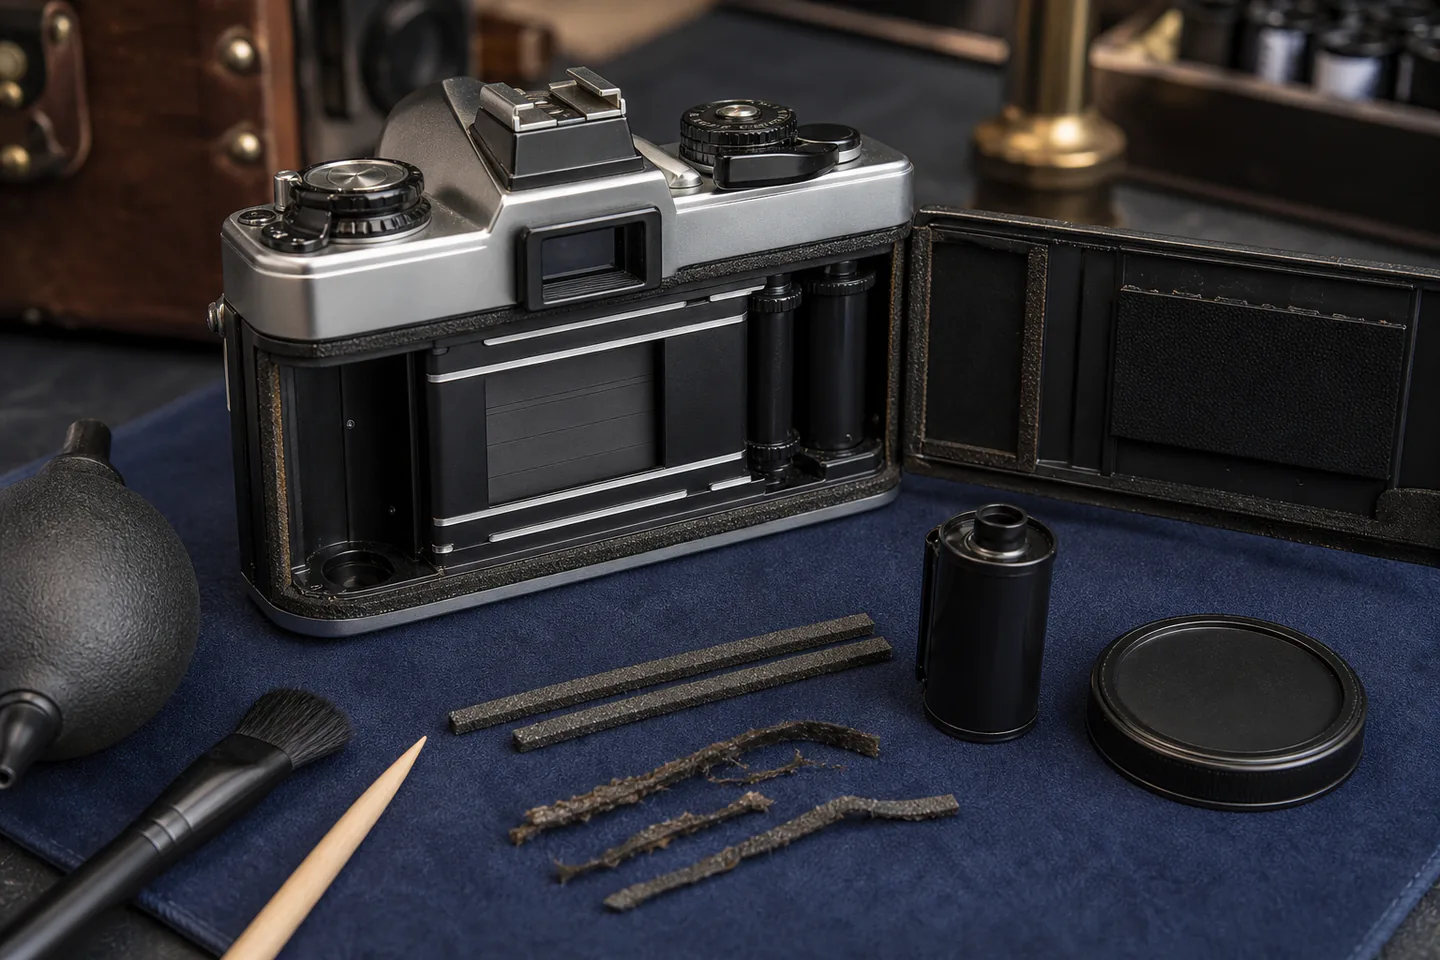
Choose a common mechanically operating 35 mm camera with an available manual, photograph the body and interior, test shutter, aperture, focus, transport and rewind without film and check the battery compartment for corrosion. Leave shutter curtains, rangefinder alignment, lens helicoids and flash capacitors untouched, replace only clearly degraded door light seals using a model-specific thickness and a card protecting the shutter, then load one fresh known film and record frames across shutter speeds and lighting conditions.
- 01
A camera that looks clean can still have inaccurate shutter timing, aperture oil, fungus or electrical faults. Record what happened during vintage camera restoration so the next attempt changes one known variable instead of several guesses.
- 02
Degraded foam must be removed without letting debris or solvent reach the shutter curtain. Record what happened during vintage camera restoration so the next attempt changes one known variable instead of several guesses.
- 03
Light-seal thickness is a mechanical dimension; too much foam can distort door closure. Record what happened during vintage camera restoration so the next attempt changes one known variable instead of several guesses.
- 04
A test roll checks transport, spacing, exposure and leaks together but does not calibrate shutter speed precisely. Record what happened during vintage camera restoration so the next attempt changes one known variable instead of several guesses.
What to expect
What vintage camera restoration is really like at the start
The useful beginner controls are preparation, one bounded task and a record of the result; specialist equipment matters only when it solves a repeated limitation.
Shutter
A curtain or leaf can be permanently damaged by touch, force, oil or loose foam debris. Record what happened during vintage camera restoration so the next attempt changes one known variable instead of several guesses.
Lens
Internal fungus, haze and separated cement are not ordinary dust and require different treatment. Record what happened during vintage camera restoration so the next attempt changes one known variable instead of several guesses.
Seal
Hinge, channel and mirror-damper foams may use different thicknesses and materials. Record what happened during vintage camera restoration so the next attempt changes one known variable instead of several guesses.
Test
Processing variation and user exposure error can resemble a camera fault without careful notes. Record what happened during vintage camera restoration so the next attempt changes one known variable instead of several guesses.
Core method
The core vintage camera restoration method
Identify and dry-test
Use the exact manual and record every control, speed, aperture, frame counter, transport and battery condition. Record what happened during vintage camera restoration so the next attempt changes one known variable instead of several guesses.
Protect sensitive parts
Cover the shutter opening with clean card and keep loose debris and solvent moving away from the body. Record what happened during vintage camera restoration so the next attempt changes one known variable instead of several guesses.
Template and replace seals
Measure and map old foam, clean the channel minimally and fit the specified material without stretching. Record what happened during vintage camera restoration so the next attempt changes one known variable instead of several guesses.
Run one diagnostic roll
Use fresh film, bracket a repeatable scene, note settings and inspect spacing, density and edge leaks. Record what happened during vintage camera restoration so the next attempt changes one known variable instead of several guesses.
Useful products
Products with a clear job in the route
The foam supports a model-specific seal repair, the fresh film provides a known test medium and the fine tweezers place narrow strips without touching adhesive faces excessively.
Japan Hobby Tool Camera Light Seal Foam, 1.5 mm
A small sheet supports a reversible first repair on a mechanically working camera body.
Ilford HP5 Plus 35 mm Black-and-White Film, 36 Exposures
A known current film makes a post-repair result easier to interpret than expired stock.
MMOBIEL Seven-Piece Precision Tweezer Set
Several profiles help reach small parts while keeping organised trays undisturbed.
First project
Replace door seals and expose one diagnostic roll
Attempt this only after dry mechanical checks pass and the shutter can be protected completely.
- 01
Find the exact manual
Confirm battery, loading, rewind, shutter and aperture operation for the precise model. Record what happened during vintage camera restoration so the next attempt changes one known variable instead of several guesses.
- 02
Record the baseline
Photograph the interior and note every dry speed, transport action, counter and control. Record what happened during vintage camera restoration so the next attempt changes one known variable instead of several guesses.
- 03
Map and remove failed foam
Protect the shutter, create thickness templates and remove debris away from the mechanism. Record what happened during vintage camera restoration so the next attempt changes one known variable instead of several guesses.
- 04
Fit and inspect new seals
Cut clean strips, avoid stretching and confirm the door closes naturally after adhesive settles. Record what happened during vintage camera restoration so the next attempt changes one known variable instead of several guesses.
- 05
Shoot a diagnostic roll
Record frame number, shutter, aperture and lighting and inspect negatives for spacing, density and leaks. Record what happened during vintage camera restoration so the next attempt changes one known variable instead of several guesses.
What can wait
What can wait until the first result
Delay anything that adds cost, risk or another variable before the basic workflow has produced something you can review.
- 01
Shutter disassembly
Timing, spring tension and fragile curtains need model-specific tools and training. Record what happened during vintage camera restoration so the next attempt changes one known variable instead of several guesses.
- 02
Lens fungus cleaning
Optical coatings, cement, helicoids and spore control complicate the work. Record what happened during vintage camera restoration so the next attempt changes one known variable instead of several guesses.
- 03
Flash opening
Capacitors can retain dangerous energy after batteries are removed. Record what happened during vintage camera restoration so the next attempt changes one known variable instead of several guesses.
- 04
Rare camera bodies
Collector value and unavailable parts make even simple damage consequential. Record what happened during vintage camera restoration so the next attempt changes one known variable instead of several guesses.
Upgrade path
Add the capability you can now name
Each stage should remove a demonstrated constraint rather than make the setup look more advanced.
Use what you own
£0–£20Existing equipment and one written plan
Dry-test and clean one common camera externally.Repeat the first route
About £25–£100 plus camera and processingA complete repeatable starter setup
Replace documented door seals and run a test roll.Add one capability
Often £50–£250One selected tool, service or learning resource
Measure shutter and focus with proper test equipment.Build specialist depth
Club, course or specialist dependentA documented specialist workflow
Undertake shutter, rangefinder or lens service with a trained camera technician.Safety & care
Keep shutters, optics and flash energy outside the first repair
A successful light-seal job does not authorise deeper calibrated or high-voltage work.
- Never touch or scrape a shutter curtain and protect it fully from foam debris, tools and solvent.
- Do not open electronic flash equipment; capacitors may retain dangerous charge after batteries are removed.
- Ventilate cleaning products, use minimal quantities and test compatibility with coatings, plastics and adhesives.
- Stop at battery leakage, fungus, oily aperture blades, torn curtains, loose glass or a rare high-value camera.
- Dispose of batteries, solvent waste and mould-contaminated material safely and wash hands after the work.
Outside help
When outside help earns its place
A camera-repair workshop is useful for shutter-speed measurement, rangefinder alignment, lens service and deciding whether a body merits deeper work.
Choose model-specific support with test equipment rather than a generic clean-and-lubricate approach.
Use outside help after the first vintage camera restoration attempt can reveal the exact technique, access or safety problem that needs live correction.
Representative UK learning and access routes checked 1 September 2026; local prices, permissions, equipment and tutor support vary.
Sources
Where the guidance came from
Authoritative and specialist guidance supports the method and safety boundaries; community discussion contributes recurring beginner problems rather than unsupported claims.
-
01
iFixit · Fixing an old film camera: light seals
Shutter protection, foam removal and first-roll method.
Open source -
02
Butkus Camera Manuals
Model-specific camera user manuals.
Open source -
03
Ron Herron · Repairing light seals
Seal degradation, cleaning and replacement material context.
Open source -
04
iFixit · Camera repair guides
Reversible disassembly and model-specific repair references.
Open source -
05
Ilford Photo · HP5 Plus
Current test film characteristics and handling reference.
Open source -
06
Reddit · r/AnalogRepair
Community evidence on foam thickness, shutters, test rolls and repair limits.
Open source -
07
Amazon UK · Camera Light Seal Foam, 1.5 mm
Exact Amazon UK product page or ISBN used for this recommendation; current price, seller, specification and availability should be confirmed.
Open source -
08
Amazon UK · HP5 Plus 35 mm Black-and-White Film, 36 Exposures
Exact Amazon UK product page or ISBN used for this recommendation; current price, seller, specification and availability should be confirmed.
Open source -
09
Amazon UK · Seven-Piece Precision Tweezer Set
Exact Amazon UK product page or ISBN used for this recommendation; current price, seller, specification and availability should be confirmed.
Open source
Guide information and links checked 1 September 2026.