Beginner’s guide · Make & create
Pleat the fabric evenly,
then let the stitches control the stretch.
Hand smocking decorates and controls evenly pleated fabric with repeated stitches. Begin with a gingham sampler and no garment shaping.
Quick answer
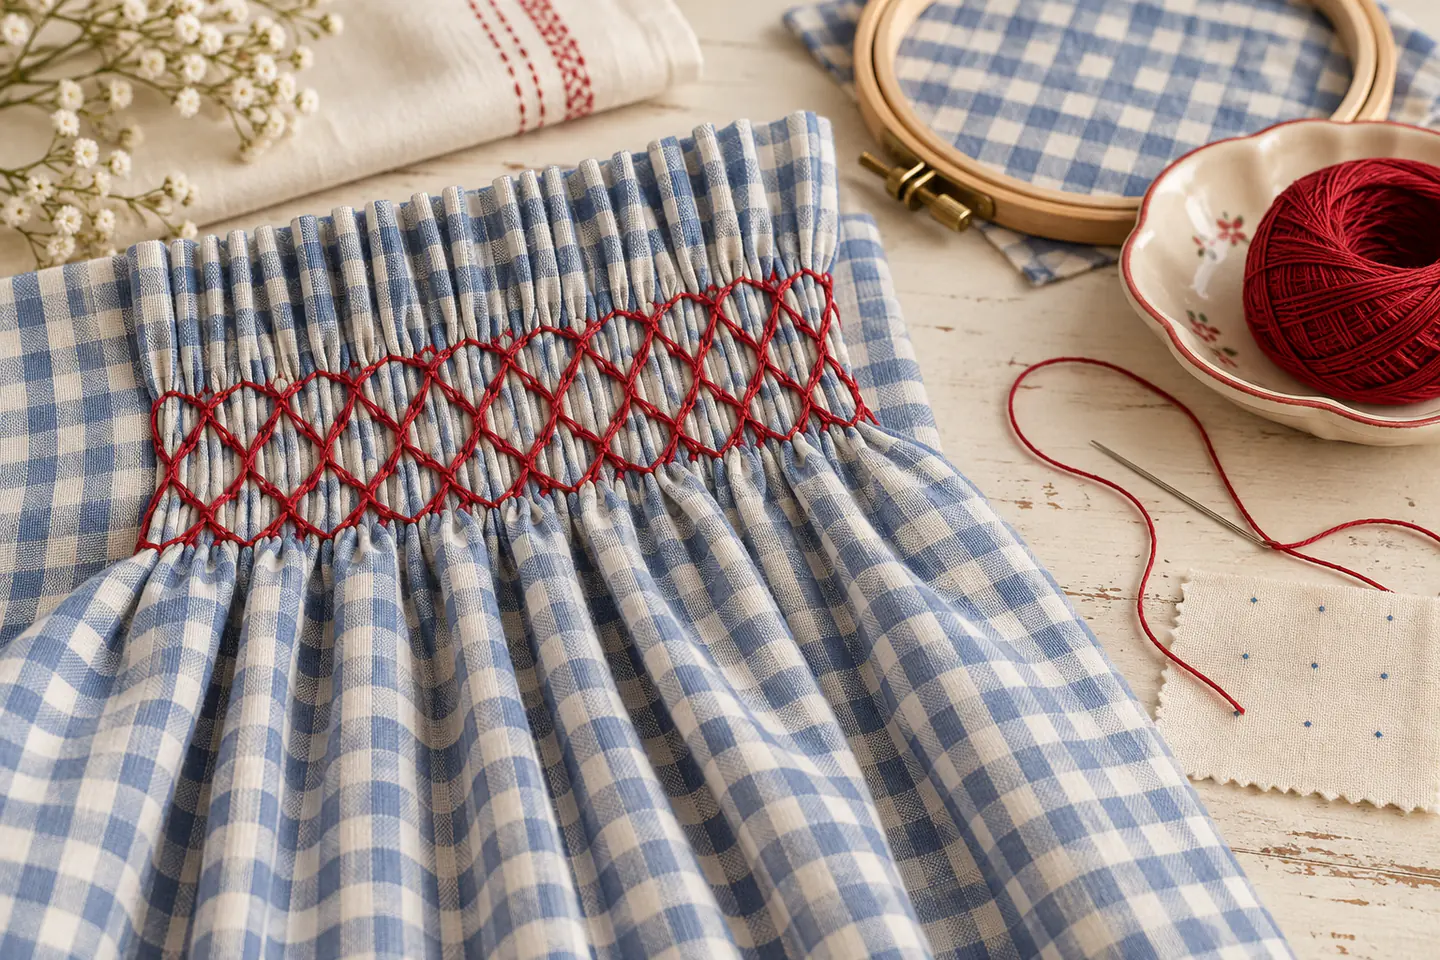
Complete one a three-row honeycomb smocking sample before expanding the setup
Choose lightweight gingham or clearly marked cotton, work parallel gathering rows at consistent intervals and pull them over a simple spacer or dowel system. Knot gathering threads in pairs without crushing the pleats, then stitch a small honeycomb band by catching the same depth on neighbouring pleats. Remove or retain guides only as the method directs.
- 01
Smocking stitches work across controlled pleats; ordinary decorative embroidery on flat cloth is not the same structure. For a first smocking attempt, keep the materials, measurements and sequence written beside the work. Photograph or measure the result before correcting it, because a visible record separates a technique problem from a material or setup problem.
- 02
Pleating rows establish the grid, and uneven spacing cannot be hidden reliably by tighter decorative stitches. For a first smocking attempt, keep the materials, measurements and sequence written beside the work. Photograph or measure the result before correcting it, because a visible record separates a technique problem from a material or setup problem.
- 03
The stitched panel should retain planned stretch rather than becoming a rigid compressed strip. For a first smocking attempt, keep the materials, measurements and sequence written beside the work. Photograph or measure the result before correcting it, because a visible record separates a technique problem from a material or setup problem.
- 04
Fabric width is reduced substantially by pleating, so garment planning begins before cutting. For a first smocking attempt, keep the materials, measurements and sequence written beside the work. Photograph or measure the result before correcting it, because a visible record separates a technique problem from a material or setup problem.
What to expect
What smocking is really like at the start
The useful beginner controls are setup, repeatable movement and a finished sample. Creating evenly spaced pleats that expand and contract freely is the main skill to observe before adding scale or decoration.
Marking
Dots or gingham checks must align in straight rows across the usable width. For a first smocking attempt, keep the materials, measurements and sequence written beside the work. Photograph or measure the result before correcting it, because a visible record separates a technique problem from a material or setup problem.
Gathering
Threads that cross or vary in bite produce twisted pleats. For a first smocking attempt, keep the materials, measurements and sequence written beside the work. Photograph or measure the result before correcting it, because a visible record separates a technique problem from a material or setup problem.
Stitch
Catching different depths changes both appearance and elasticity. For a first smocking attempt, keep the materials, measurements and sequence written beside the work. Photograph or measure the result before correcting it, because a visible record separates a technique problem from a material or setup problem.
Fit
A pretty sampler does not establish the fabric allowance for a bodice or cuff. For a first smocking attempt, keep the materials, measurements and sequence written beside the work. Photograph or measure the result before correcting it, because a visible record separates a technique problem from a material or setup problem.
Core method
The core smocking method
Mark and gather a test panel
Use a ruler or gingham grid and make several parallel rows with matching stitch length. For a first smocking attempt, keep the materials, measurements and sequence written beside the work. Photograph or measure the result before correcting it, because a visible record separates a technique problem from a material or setup problem.
Distribute the pleats
Pull gently over an even spacer, align vertical folds and secure row pairs. For a first smocking attempt, keep the materials, measurements and sequence written beside the work. Photograph or measure the result before correcting it, because a visible record separates a technique problem from a material or setup problem.
Work one honeycomb band
Catch consistent pleat depth and compare the relaxed and expanded width frequently. For a first smocking attempt, keep the materials, measurements and sequence written beside the work. Photograph or measure the result before correcting it, because a visible record separates a technique problem from a material or setup problem.
Finish the sample
Secure threads, remove guides as instructed and record the contraction ratio. For a first smocking attempt, keep the materials, measurements and sequence written beside the work. Photograph or measure the result before correcting it, because a visible record separates a technique problem from a material or setup problem.
Useful products
Products with a clear job in the route
These two products cover distinct jobs in the beginner route; they are not a requirement to buy a bundle. Use materials already owned when they meet the same specification, and confirm every live listing before ordering.
Swpeet Linen Embroidery Kit with Hoops and 50 Floss Colours
Plain fabric makes stitch placement and tension easier to inspect.
Pllieay Embroidery Starter Kit with Hoops and 100 Threads
The hoops, needles and stranded cotton support several specialist embroidery samples.
First project
Make a three-row honeycomb smocking sample
Keep the project small enough to finish, inspect and repeat. The first result is evidence about material compatibility, sequence and control rather than a performance test.
- 01
Prepare the workspace and materials
Use a ruler or gingham grid and make several parallel rows with matching stitch length. For a first smocking attempt, keep the materials, measurements and sequence written beside the work. Photograph or measure the result before correcting it, because a visible record separates a technique problem from a material or setup problem.
- 02
Make the first controlled pass
Pull gently over an even spacer, align vertical folds and secure row pairs. For a first smocking attempt, keep the materials, measurements and sequence written beside the work. Photograph or measure the result before correcting it, because a visible record separates a technique problem from a material or setup problem.
- 03
Check the central technique
Catch consistent pleat depth and compare the relaxed and expanded width frequently. For a first smocking attempt, keep the materials, measurements and sequence written beside the work. Photograph or measure the result before correcting it, because a visible record separates a technique problem from a material or setup problem.
- 04
Complete the structure
Secure threads, remove guides as instructed and record the contraction ratio. For a first smocking attempt, keep the materials, measurements and sequence written beside the work. Photograph or measure the result before correcting it, because a visible record separates a technique problem from a material or setup problem.
- 05
Finish, measure and record
Let the work settle or dry by the relevant material instructions, then measure, photograph and label the result. Record the one change that would make the next smocking attempt more controlled. For a first smocking attempt, keep the materials, measurements and sequence written beside the work. Photograph or measure the result before correcting it, because a visible record separates a technique problem from a material or setup problem.
What can wait
What can wait until the first result
Delay anything that adds cost, risk or another variable before the basic workflow has produced something you can review.
- 01
Child’s dress
Fit, closures and safety need more than a stitch sampler. For a first smocking attempt, keep the materials, measurements and sequence written beside the work. Photograph or measure the result before correcting it, because a visible record separates a technique problem from a material or setup problem.
- 02
Mechanical pleater
Hand gathering reveals the structure before a costly machine. For a first smocking attempt, keep the materials, measurements and sequence written beside the work. Photograph or measure the result before correcting it, because a visible record separates a technique problem from a material or setup problem.
- 03
Silk fabric
Slippery expensive cloth magnifies marking errors. For a first smocking attempt, keep the materials, measurements and sequence written beside the work. Photograph or measure the result before correcting it, because a visible record separates a technique problem from a material or setup problem.
- 04
Many decorative stitches
One elastic stitch family is enough to judge pleat control. For a first smocking attempt, keep the materials, measurements and sequence written beside the work. Photograph or measure the result before correcting it, because a visible record separates a technique problem from a material or setup problem.
Upgrade path
Add the capability you can now name
Each stage should remove a demonstrated limitation rather than make the setup look more advanced.
Gingham sampler
Use owned tools where possibleOne small sample and written notes
Learn the central movement and material behaviour.Smocked cuff
About £20–£80A repeatable complete starter setup
Repeat the result with cleaner finish and fewer corrections.Garment panel
About £50–£180A selected tool or structured class
Add one technique, size or design capability.Fine heirloom work
Cost varies widelyA documented specialist workflow
Develop original work with provenance, testing and appropriate safety.Safety & care
Safety, care and respectful practice in smocking
The practical risks are manageable when tools, materials and cultural claims remain specific and proportionate.
- Store needles and pins securely and account for them after gathering. For a first smocking attempt, keep the materials, measurements and sequence written beside the work. Photograph or measure the result before correcting it, because a visible record separates a technique problem from a material or setup problem.
- Use bright light and take visual breaks during repeated pleat counting. For a first smocking attempt, keep the materials, measurements and sequence written beside the work. Photograph or measure the result before correcting it, because a visible record separates a technique problem from a material or setup problem.
- Relax the grip and shoulders rather than forcing a needle through thick gathers. For a first smocking attempt, keep the materials, measurements and sequence written beside the work. Photograph or measure the result before correcting it, because a visible record separates a technique problem from a material or setup problem.
- Test marking removal and colourfastness on the actual fabric. For a first smocking attempt, keep the materials, measurements and sequence written beside the work. Photograph or measure the result before correcting it, because a visible record separates a technique problem from a material or setup problem.
- Check fit, drawstrings, buttons and small parts before making children’s clothing. For a first smocking attempt, keep the materials, measurements and sequence written beside the work. Photograph or measure the result before correcting it, because a visible record separates a technique problem from a material or setup problem.
Outside help
When outside help earns its place
A guided session is useful when equipment setup, live hand correction, heat, sharp tools or a specialist press blocks safe progress. A clear source is enough for the smallest smocking sample.
Choose one coherent lesson that covers preparation, the central smocking technique, finishing and common mistakes.
Ask which tools and materials are included, whether the project can be finished in the session and what safety induction is provided.
Representative UK learning and access routes checked 20 September 2026; local prices, equipment and tutor support vary.
Sources
Where the guidance came from
Authoritative and specialist guidance supports the method, terminology and safety boundaries; community discussion contributes recurring beginner problems rather than unsupported claims.
-
01
Royal School of Needlework · Stitch Bank
Specialist stitch structure, terminology and diagrams.
Open source -
02
Royal School of Needlework
UK specialist teaching and technique context.
Open source -
03
DMC · Stitch guide
Manufacturer diagrams for common hand-embroidery stitches.
Open source -
04
Victoria and Albert Museum · Embroidery
Historical, material and object context for embroidery.
Open source -
05
Embroiderers’ Guild
UK community, education and regional-group routes.
Open source -
06
Reddit · r/Embroidery
Recurring beginner evidence on tension, fabric and finishing.
Open source -
07
Amazon UK · Linen Embroidery Kit with Hoops and 50 Floss Colours
Exact Amazon UK catalogue page or ISBN used for the recommendation; confirm current price, seller, specification and availability.
Open source -
08
Amazon UK · Embroidery Starter Kit with Hoops and 100 Threads
Exact Amazon UK catalogue page or ISBN used for the recommendation; confirm current price, seller, specification and availability.
Open source
Guide information and links checked 20 September 2026.