Beginner’s guide · Make & create
Tie one knot.
Repeat it evenly.
Start with 550-style craft cord, a split ring and a cobra-knot key fob. The first useful skill is even tension—not a jig, survival claims or a complicated bracelet sized before the knot is understood.
Quick answer
A key fob avoids sizing and buckle problems
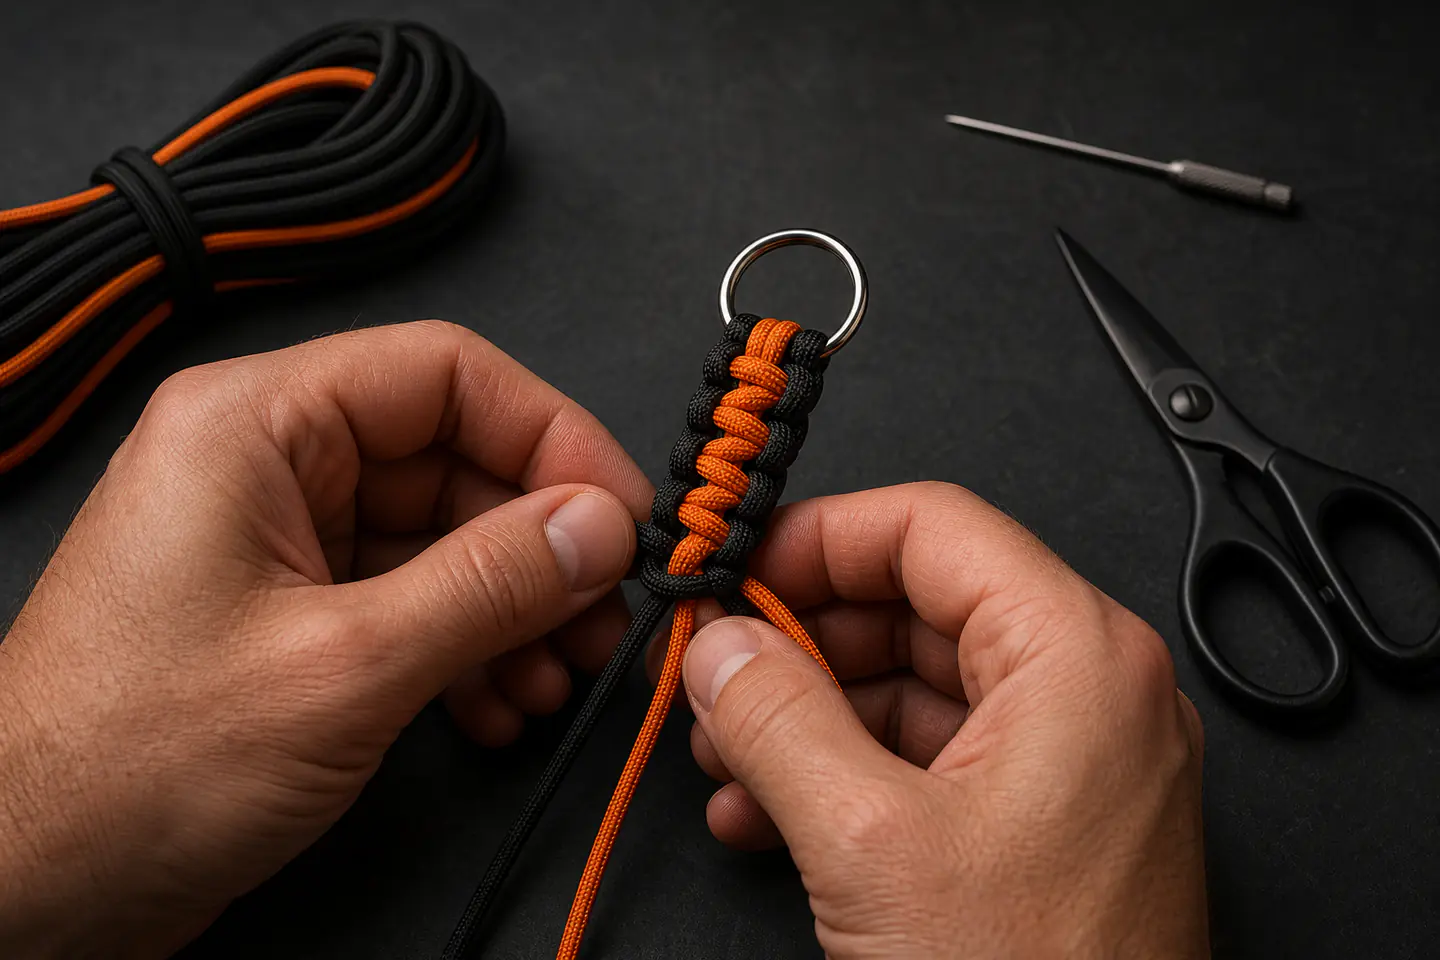
Fold a short length of craft paracord through a steel split ring, leave two centre strands and repeat the cobra knot around them. Tighten each knot with the same hand movement and compare both edges as the fob grows.
- 01
Use one high-contrast colour first so the working and centre strands remain easy to follow.
- 02
Cut more cord than the tutorial estimates; tightness and core length change consumption.
- 03
A sharp pair of scissors is enough to start. Cord needles and jigs solve later finishing and repetition jobs.
- 04
The number 550 is not permission to climb, suspend a person, tow or make safety-critical pet equipment.
What to expect
Tension changes the shape more than the knot name
The cobra knot is simple to understand and surprisingly easy to vary. The finished edge records every change in pull direction and force.
Orientation
Alternating the starting side produces a flat cobra weave. Repeating the same side makes the work spiral.
Tension
Loose knots spread apart; hard uneven pulls distort the core. Snug each knot into place before starting the next.
Cord use
Weaves consume far more length than the finished object. Tutorials give estimates, not guarantees.
Hardware
A split ring is forgiving. Buckles and clips add sizing, attachment direction and quality questions.
Finish
Cut ends fray. They can be tucked into suitable weaves or carefully heat-sealed, but molten nylon can burn skin.
Core knot
Make the knot visible before making it fast
Build a stable core
Pass the cord through the split ring and arrange two straight centre strands. Pin or tape the ring to a protected work surface if it helps. Keep the centre straight without stretching it tight.
Alternate deliberately
Take the left working strand across the front of the core, pass the right strand over that tail, behind the core and through the left loop. Snug it. Mirror the entire path from the other side. A short spoken cue—left front, right behind; right front, left behind—can prevent an accidental spiral.
Judge both edges
After every few knots, lay the work flat and compare width, spacing and the exposed core. Undo mistakes early; paracord tolerates reworking better than a finished fob tolerates one twisted section.
Starter products
Cord and a ring make the first project
The 30-metre black cord provides practice length and a clear view of the knot. The steel split rings create several low-risk projects. The needle set belongs to later tucking, lacing and decorative work rather than the first six inches of cobra knot.
TECEUM 550-Style Paracord, Black, 30 m
A single colour keeps strand paths visible and provides enough length to undo and remake several short projects.
Unbranded Twenty Stainless Flat Split Rings, 25 mm
A split ring anchors a short fob and leaves the lesson focused on alternating cobra knots.
First project
Tie one short cobra-knot key fob
Follow a reputable visual tutorial for hand positions and use this sequence as the project check.
- 01
Choose the finished length
Aim for a short fob that does not catch on objects. Cut a generous cord length and leave trimming until the weave is complete.
- 02
Attach the centre
Fold or hitch the midpoint through the split ring so two even core strands run down the centre.
- 03
Tie the first pair
Make one half from the left, then its mirror from the right. Check that the ring stays centred.
- 04
Repeat at even tension
Slide each knot firmly against the last without crushing the core. Stop and flatten the work every few pairs.
- 05
Check the length
Allow room for the final finish. Undo any obvious twist rather than hiding it under more knots.
- 06
Finish the ends
Use a tuck-back method where the pattern permits, or have a competent adult make a minimal controlled heat seal over a heatproof surface.
Troubleshooting
Measure the result, not just the loose cord
A spiral usually has a simple cause
If the weave twists consistently, the same side has probably started consecutive knots. Undo to the last flat pair and resume the left-right alternation. If only one section bulges, compare how far each knot was snugged before the next began.
Cord estimates are starting points
Diameter, brand, core strands and personal tension change consumption. Record starting length, finished weave length and leftover cord. After two fobs, the estimate will be more useful than a generic chart.
Finish without creating a sharp lump
Needles or a smoothing tool can tuck tails under existing knots when the design allows. Heat sealing should soften only the cut end, never ignite the cord. Work over a heatproof surface with ventilation and water nearby; never press molten nylon with bare skin.
Skip for now
What can wait
More hardware creates more ways for a project to be the wrong size or used beyond its strength.
- 01
The needle and smoothing set
Helpful for tucking ends, lacing and complex decorative knots. A first cobra fob can be learned without it.
- 02
A bracelet jig
Jigs make repeat lengths easier but do not teach tension. They matter after several correctly sized bracelets are planned.
- 03
Large buckle assortments
Buckle width changes the weave and sizing calculation. Buy hardware for a specific proven project.
- 04
Pet leads and collars
Animal restraint makes hardware, wear and load consequences much more serious. Decorative confidence is not safety certification.
- 05
Survival or climbing claims
Craft paracord is not a fall-arrest rope, certified tow line or human suspension system regardless of a listed breaking figure.
Upgrade path
Add tools for repetition and finishing
Tools help most after the hands understand which strand should move and how firmly it should settle.
One key fob
About £10–£1530 m cord + split ring + sharp scissors
Learn orientation, alternating knots, tension and cord consumption.Cleaner finishing
About £5–£20Fids or lacing needles + smoothing tool
Tuck tails and work under tight knots with less surface damage.Sized bracelets
About £20–£60Reliable buckles + tape measure + simple jig
Repeat a measured core length while learning how a weave changes fit.Complex multi-cord work
Project dependentColour plan + specialist hardware + knot reference
Build round braids, handles and decorative patterns with documented loads kept non-critical.Safety
Craft cord is not life-safety rope
A product name or breaking-strength claim does not certify the finished knot, ring or project for a person’s weight.
- Never use craft paracord for climbing, rappelling, fall arrest, human suspension, rescue or towing.
- Do not make load-critical pet restraints, child restraints or vehicle hardware without purpose-rated components and appropriate expertise.
- Cut away from hands with sharp scissors or cutters and store needles and smoothing tools safely.
- If heat-sealing nylon, an adult should work over a heatproof surface with ventilation and water nearby; molten polymer sticks and burns.
- Do not deliberately ignite or inhale smoke from paracord; trim charred material and stop if the cord catches fire.
- Inspect key rings and finished knots for sharp edges, loose ends and damage before ordinary decorative use.
Classes
When outside help is useful
Free visual tutorials are usually enough for a key fob. A class helps with hand position, tension and fixing a mistake in real time.
Choose one that shows every strand path slowly and names the starting side of each cobra half.
A current UK session in this range supplies hardware and demonstrates a complete wearable project.
Useful when local paracord classes are scarce, provided cord type and load limits are discussed honestly.
Representative UK paracord and related knotting sessions checked 27 July 2026; specialist local classes are uncommon.
Sources
Where the guidance came from
Specialist paracord tutorials support the cobra-key-fob route. Manufacturer and rope-safety warnings set the strict boundary against climbing and human support; community posts informed the minimal tool list and tension troubleshooting.
-
01
Paracord UK · Flower keychain tutorial
Photo tutorial using cobra knots, a key ring, cutting and finishing.
Open source -
02
Paracord.nl · Paracord knot techniques
Specialist library of cobra-knot and other paracord tutorials.
Open source -
03
Paracord Planet · The basics of paracord
Current specialist overview and explicit life-safety limitation.
Open source -
04
Paracord Planet · Can paracord be used for climbing?
Reasons 550 paracord is not a substitute for climbing rope.
Open source -
05
Netherlands Food and Consumer Product Safety Authority · Textile risks
Synthetic fibres can melt when exposed to flame.
Open source -
06
r/paracord · Getting started
Current community consensus that cord, cutting and simple projects are enough to begin.
Open source -
07
r/paracord · Beginner-friendly projects
Recent beginner recommendations for keychains, cobra knots and repeated practice.
Open source -
08
r/paracord · Supplies recommendations
Practitioner list covering cord, rings, cutting tools and optional fids.
Open source -
09
Creative Craft Show · Macramé paracord bracelet workshop
Representative £20 UK paracord workshop.
Open source -
10
Amazon UK · TECEUM 550 paracord
Exact black 30 m seven-strand craft cord; £8.99 observed and available.
Open source -
11
Amazon UK · Stainless split rings
Exact twenty-pack of 25 mm flat split rings; £3.49 observed and available.
Open source -
12
Amazon UK · Namvo paracord needle set
Exact four-piece needle and smoothing tool set; £4.99 observed and available.
Open source
Guide information and links checked 27 July 2026.