Beginner's guide · Make & create
Start with a small shaggy panel.
Use cloth already worn soft.
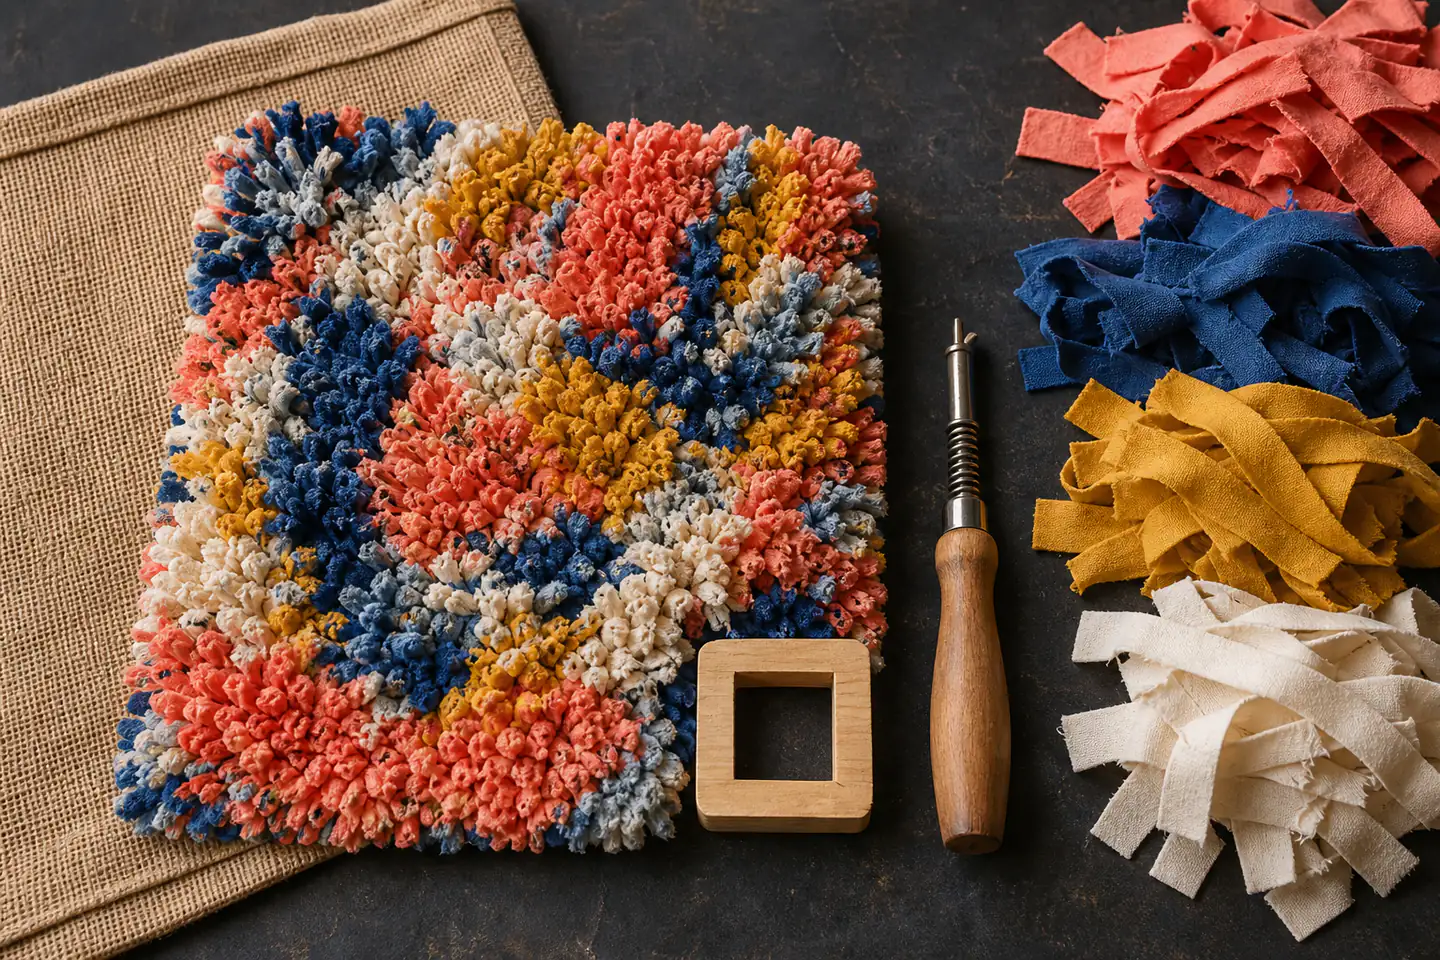
Start with hemmed hessian, a spring tool, a cutting gauge and washed cotton-jersey strips. The forgiving proggy or shaggy technique teaches spacing and fabric choice on a cushion panel or small mat before a full floor rug demands months of cutting.
Quick answer
Start with a small shaggy panel.
Choose the Ragged Life shaggy or proggy route on hemmed hessian. Wash and dry the old cotton jersey, cut strips to one consistent gauge and work a simple border-first design, pushing or pulling each piece through adjacent holes so both ends form the pile.
- 01
Ragged Life describes shaggy rugging as a forgiving beginner technique requiring a spring tool, cutting gauge and hessian.
- 02
Use a small panel first. A 100 × 60 cm rug contains far more fabric and repetitive cutting than the empty hessian suggests.
- 03
T-shirts and other stable soft fabrics are easier to pull than thick seams, zips, labels or very fraying cloth.
- 04
A floor rug needs secure edges, suitable density and an anti-slip solution appropriate to the finished surface; a first wall or cushion panel avoids wear claims.
What to expect
What the first attempts really involve
The first project is useful because it exposes the decisions that shopping pages tend to hide.
Fabric volume
A dense shaggy surface consumes a surprising amount of cloth. Cut a sample area and estimate from that before planning colours for a large rug.
Preparation
Washing, removing seams and cutting strips can take as long as the rugging. A cutting gauge keeps the pile more even.
Spacing
Packing every hessian hole creates stiffness and uses excess fabric. Work from the chosen technique's spacing guidance.
Ergonomics
Repetitive grip and cutting can fatigue hands and shoulders. Short sessions and a supported panel are better than finishing one colour at any cost.
Use
A decorative wall piece, cushion and washable floor mat have different edge, backing and durability needs.
Fundamentals
Build the first attempt on reliable fundamentals
Choose one British rag-rug technique
Shaggy or proggy rugging pushes or pulls short fabric pieces through hessian so cut ends stand proud. Hooky rugging creates loops and short shaggy is a hybrid. Use the technique taught by the selected kit from start to finish rather than mixing spacing and strip sizes from different tutorials.
Prepare compatible cloth
Start with washed colourfast cotton jersey from old T-shirts, excluding printed rubbery areas, thick hems, zips and hard trims. Cut a small sample through the gauge and pull it into spare hessian. Reject fabric that shreds excessively, feels too bulky or stains a damp white cloth.
Plan a small border-first panel
Mark a simple block or stripe design on hemmed hessian, leaving the maker's safe border. Work an outline or one corner, checking the back and surface every few rows. A small cushion front or table mat shows spacing clearly and is easier to finish than an immediate full rug.
Starter products
Three Ragged Life routes—choose one project size
The cushion kit is the recommended small first project. The introductory 100 × 60 cm kit and Easy Peasy spring-tool kit are larger alternatives for someone deliberately choosing a rug. They are not three purchases and none includes an endless supply of fabric.
Ragged Life Rag Rug Cushion Kit
It teaches the same hessian, tool, strip and spacing decisions while making the first finish achievable across several evenings.
Ragged Life Introductory Rag Rug Making Kit, 100 × 60 cm
It shows that scaling up mainly adds hessian area, cloth preparation and time rather than requiring an unrelated tool system.
First panel
Make a small shaggy cushion panel
Use the exact Ragged Life kit instructions for strip size, spacing and edge finishing. Keep the design to broad stripes or a simple central shape.
- 01
Inventory the kit
Identify the hessian, spring tool, gauge and instructions. Check whether fabric and cushion pad are included rather than assuming from the photo.
- 02
Choose and wash fabric
Select two or three soft compatible colours, wash them as the finished object will be washed and test for colour transfer.
- 03
Remove hard sections
Cut away hems, collars, zips, buttons, transfers and thick seams before making strips.
- 04
Mark a simple design
Draw only broad areas on the hessian, keeping within the finishing allowance and checking which side will face out.
- 05
Cut one sample batch
Use the gauge for consistent pieces and keep scissors pointed away from the supporting hand.
- 06
Work a test corner
Follow the spring-tool sequence and the recommended hole spacing, then inspect density from front and back.
- 07
Adjust once
Change strip width, length or spacing only after the sample shows a specific problem, then keep the chosen settings for the panel.
- 08
Work in short rows
Alternate cutting and rugging to avoid hand strain and to confirm enough fabric remains for each colour area.
- 09
Finish for its intended use
Use the kit's cushion, wall or mat finishing method. Do not place it on a floor until edges, shedding and slip resistance are appropriate.
Troubleshooting
Read the result before buying another tool
A stiff board-like panel is too dense or bulky
Compare the sample with the maker's spacing guidance and use thinner fabric or more open placement. Forcing extra strips can damage hessian threads.
Loose pieces point to wrong size or method
Check strip length, width, hessian hole size and whether the spring tool completed the intended action. Do not secure every loose strip with random glue.
Uneven colour areas need a fabric estimate
Count strips used in a measured sample and calculate the remaining area. Introduce a deliberate stripe or border before one colour runs out rather than scattering substitutions.
Skip for now
What can wait
A small panel proves fabric preparation, tool comfort and pile preference before floor-scale commitment.
- 01
A room-size rug
It multiplies cloth, cutting, repetitive motion and finishing. Complete and live with a cushion or small mat first.
- 02
A frame
The Ragged Life spring-tool shaggy method can be worked on the lap or table. A frame suits other techniques or personal ergonomics later.
- 03
Rotary cutting immediately
A rotary cutter needs a complete mat-and-ruler safety system. Good fabric scissors and the supplied gauge are enough to begin.
- 04
Unverified non-slip coatings
Some liquid backings change washability, smell and material behaviour. Choose a tested floor solution only for a finished rug and its specific surface.
Upgrade path
What a better setup changes
The useful path increases surface area or changes technique only after strip preparation and hand comfort are understood.
Small cushion panel
About £20–£35 plus reused fabricHemmed hessian + spring tool + gauge
Teaches strip preparation, spacing and finishing at manageable scale.Full 100 × 60 cm rug
About £25–£40 plus substantial fabricLarger hemmed hessian + same tools
Adds colour planning, material estimation and longer ergonomic workload.Hooky or short-shaggy work
Add technique-specific tool or classHook + frame if required + different strip plan
Creates loops or a tighter graphic pile as a distinct technique.Safety
Work safely from the first attempt
Fabric cutting, repetitive movement, dust and the final object's floor use all deserve deliberate checks.
- Use sharp fabric scissors on a stable surface and keep the supporting hand clear of the cutting gauge groove.
- Take regular hand, wrist, shoulder and back breaks; stop if numbness or pain develops.
- Wash reused textiles and avoid mouldy, contaminated or heavily shedding fabric.
- Keep the pointed spring tool covered or boxed and away from children.
- Treat a finished piece as decorative until edge security, shedding and slip behaviour have been assessed for the intended floor.
Classes
When outside help is useful
A class is useful for trying shaggy, hooky and short-shaggy methods before choosing tools for a larger piece.
A short workshop should let participants try at least one technique and begin a small take-home project.
A full day is worthwhile when it compares several British techniques and includes sufficient supervised making time.
Ragged Life UK class and kit formats checked 30 July 2026; venue and included project affect price.
Sources
Sources and checking notes
Ragged Life supplies the technique definitions and beginner tool logic, while its current Amazon kit records make project-size alternatives explicit.
-
01
Ragged Life · Proggy and shaggy rugs
Beginner technique, tools, hessian and fabric preparation.
Open source -
02
Ragged Life · Rag rug techniques
Comparison of shaggy, hooky and other rugging methods.
Open source -
03
Ragged Life · Short shaggy
Hybrid technique and its different visual result.
Open source -
04
Ragged Life · Beginner shaggy kit
Current manufacturer kit purpose and project route.
Open source -
05
Amazon UK · Introductory Ragged Life kit
Exact 100 by 60 cm no-fabric kit checked for current UK availability.
Open source -
06
Amazon UK · Easy Peasy Ragged Life kit
Exact larger spring-tool kit checked for current UK availability.
Open source -
07
Amazon UK · Ragged Life cushion kit
Exact smaller beginner project checked for current UK availability.
Open source -
08
Amazon UK · Peak Dale rag rug kit
Exact alternative British kit checked for comparison.
Open source
Guide information and links checked 30 July 2026.