Beginner’s guide · Make & create
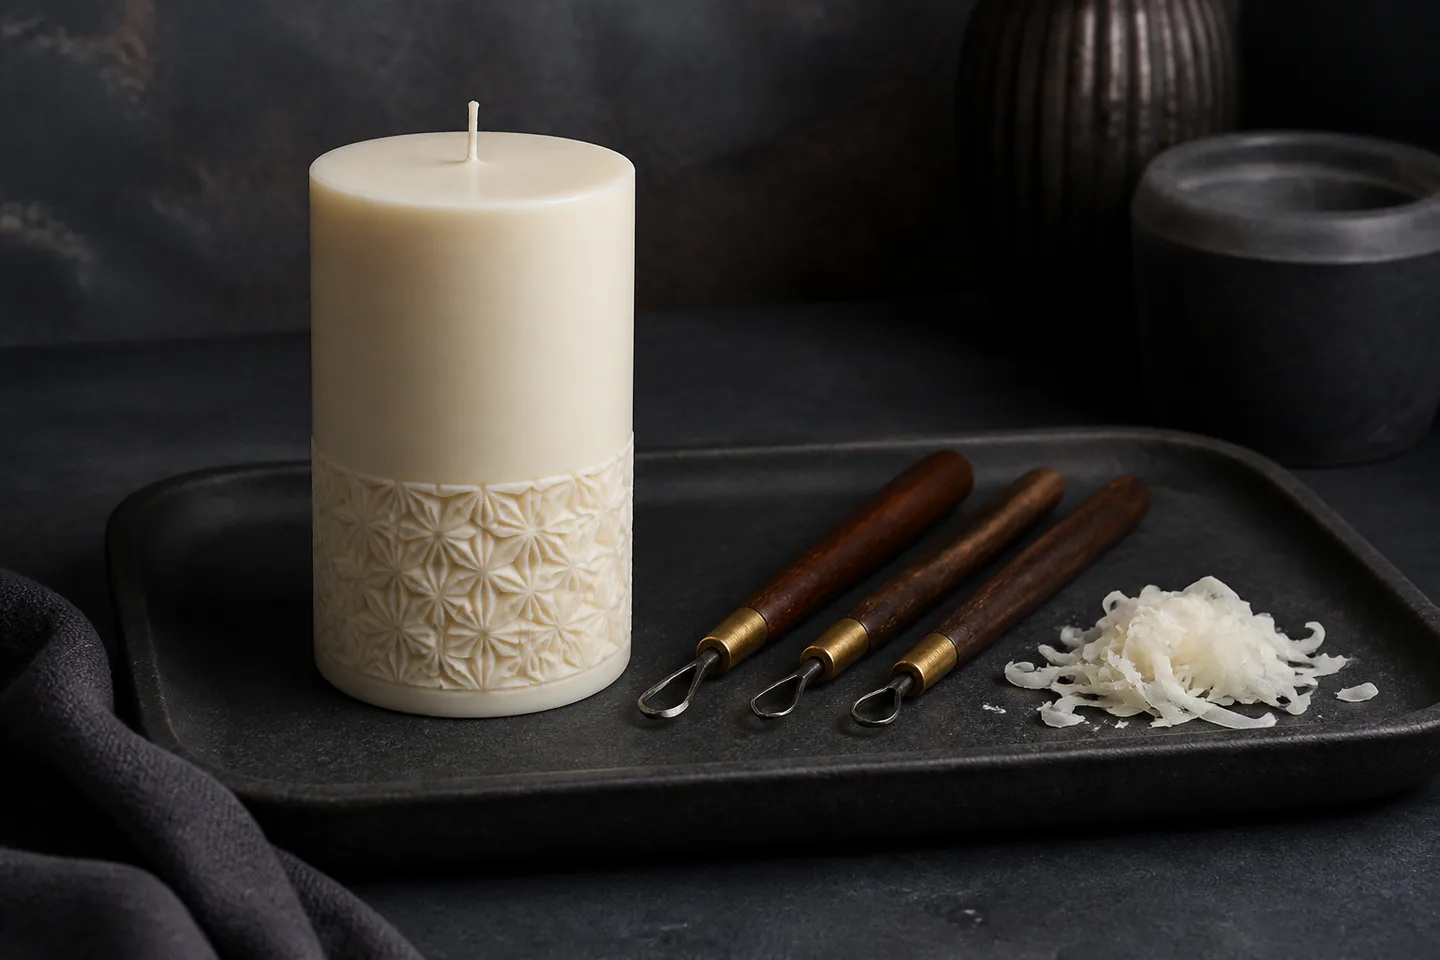
A shallow carved geometric band on one pillar candle
Practise shallow relief on a cold unlit pillar.
Begin with an unscented solid-colour pillar candle and simple wax tools. Shallow geometric relief teaches pressure, edge cleanup and design around a cylinder without hot dipping vats or carving a burning candle.
Quick answer
Carve a repeated shallow band into a cold solid pillar
Choose a plain unscented pillar with a substantial diameter and no container, paint or embedded decoration. Leave it unlit and at a stable cool room temperature. Wrap a paper band around the lower third, mark a repeated leaf or diamond motif, then use a small rounded wax tool to remove very shallow chips away from the supporting hand. Rotate the candle on a tray, brush shavings into a container and keep the wick and top burn pool area untouched.
- 01
This route means cold shallow relief carving. Traditional multicolour carved candles use hot wax dipping and timed warm carving, which is a different studio process.
- 02
A decorative candle must still follow its maker’s burn instructions; carving can change wall thickness, wax flow and stability.
- 03
Deep cuts, tunnels and undercuts can expose the wick path or create collapse and uneven burning.
- 04
Never carve a lit or recently extinguished candle, and keep tools away from heat and open flame.
What to expect
What the first candle carving result really teaches
Wax changes with temperature. Too cold can chip; too warm can smear, grab a tool or lose detail. Small shallow tests reveal the workable state.
Candle
Use a stable known pillar rather than a jar, taper or candle with unknown embedded objects.
Layout
A paper strip divides the circumference evenly and avoids a motif that fails to meet at the back.
Depth
Shallow relief keeps more wall thickness and creates cleaner beginner corrections.
Tool
Rounded loops and small spatulas remove wax predictably; knives create deeper injury-prone cuts.
Temperature
Let a soft or warm candle return to stable room temperature instead of refrigerating or heating it aggressively.
Burn
Treat the finished object as decorative unless its manufacturer’s burn guidance still clearly applies and every cut is conservative.
Core method
Build one repeatable candle carving workflow
Select and inspect one pillar
Choose an unlit smooth pillar with an intact wick, level base and no cracks, glass container, dried flowers or embedded decoration. Read its burn label and photograph it. If the candle is intended only for display, mark it accordingly rather than assuming carving improves burn safety.
Plan a measured paper band
Cut a strip that wraps the circumference, divide it into equal sections and draw a simple motif with generous spacing. Tape the paper to itself rather than the wax where possible and transfer tiny guide marks using a blunt point without piercing deeply.
Carve shallowly on a tray
Support the pillar on a non-slip tray and keep the free hand behind the tool path. Scoop a small chip from each repeated position, rotating the candle rather than twisting the wrist. Match depth by comparing shadows under side light and stop if wax cracks or deforms.
Clean and assess the object
Use a soft brush or cloth approved for wax to remove loose crumbs, collecting them rather than washing wax down drains. Check wall thickness, base, wick and cracks. Keep the candle unlit while deciding whether the conservative design remains within the original burn instructions.
Useful products
Products with a clear job in the setup
The DEXI wax tools are the main controlled-carving route, the second stainless set is an alternative profile selection and the Stonebriar pillars supply repeatable blanks. Choose one tool set plus suitable candles.
DEXITR Wax Carving Tool Set, 5 Pieces
A compact profile range is sufficient for repeated bands and shallow texture.
Stonebriar Unscented White Pillar Candles, 3 × 6 in
The plain surface makes depth and spacing easy to see and allows more than one practice piece.
Genround Stainless Wax Carving and Modelling Tools
Different ends can create narrow grooves and lift small chips in display work.
First project
Carve one eight-repeat band
A repeated motif makes depth and spacing comparable while preserving most of the pillar wall.
- 01
Read the candle label
Confirm wick, base and body are intact and keep the candle unlit.
- 02
Divide a paper strip
Create eight equal positions and a shallow simple motif.
- 03
Transfer tiny guides
Mark without piercing toward the wick.
- 04
Carve one test recess
Use a rounded tool away from the supporting hand.
- 05
Repeat at equal depth
Rotate the pillar and inspect under side light.
- 06
Collect shavings and inspect
Check cracks, wall thickness and whether it should remain display-only.
What can wait
What can wait until the first result
Hot-dipped multicolour carving, flames and deep sculptural cuts belong to a trained studio or a display-only practice.
- 01
A heated dipping vat
It introduces molten wax, temperature control, large vessels and fire risk.
- 02
Carving while burning
Flame, liquid wax and sharp tools must never share the task.
- 03
Deep tunnels
They weaken the wall and change heat and melt behaviour.
- 04
Painted or embedded candles
Unknown coatings, botanicals and glitter can affect tools and burning.
- 05
A sharp kitchen knife
Purpose wax tools give shallower control and reduce the temptation to lever.
Upgrade path
Upgrade the repeated limitation
Add complexity by refining tool profiles or design—not by bringing flame or vats into an unsuitable room.
Cold relief start
About £20–£45Pillars + one wax tool set
Learn spacing and shallow depth.Detailed display work
About £30–£100More tool profiles + custom templates
Create finer unlit decorative surfaces.Supervised warm carving
About £70–£180Studio class with prepared dipped blanks
Learn timed traditional cuts safely.Production dipping studio
About £800–£5,000+Controlled vats, fire precautions and ventilation
Make layered carved candles professionally.Safety & care
Keep flame, hot wax and carving separate
The low-risk beginner route uses a cold unlit pillar. Every change to a candle can alter burn behaviour, so decoration never overrides the original safety label.
- Never carve a lit, warm or recently extinguished candle; keep all flames and heat sources outside the carving workspace.
- Cut or scoop away from hands on a stable tray, use shallow controlled pressure and store pointed tools immediately.
- Preserve generous wax around the wick and base, reject cracked or unstable candles and keep conservatively carved pieces display-only if burn suitability is uncertain.
- If a carved candle is burned within its documented instructions, place it on a heat-resistant holder, trim wick as directed and never leave it unattended.
- Do not wash wax shavings into drains; collect them, keep them away from children and pets and dispose of or reuse only under safe documented methods.
Outside help
When outside help earns its place
Cold relief can be self-taught with care. Traditional multicolour warm carving needs an established studio with controlled wax temperatures, fire precautions and close instruction.
Use unlit pillars and conservative depth.
Confirm vats, fire controls, age limits and whether blanks are pre-dipped.
Representative UK product, workshop, lesson and club costs checked 13 August 2026; local prices, access, materials and tutor support vary.
Sources
Where the guidance came from
Fire-safety authorities and candle makers define burning limits; specialist carvers and communities provide tool and design experience.
-
01
London Fire Brigade · Candle safety
UK fire-safety guidance for candle use.
Open source -
02
British Candlemakers Federation
UK candle standards and safety context.
Open source -
03
National Candle Association · Safety
Candle care and burn-safety guidance.
Open source -
04
Candle Carvers community
Practitioner discussion of traditional techniques and tools.
Open source -
05
Reddit · r/Candlemaking
Community evidence on wax, wicks and decoration risks.
Open source -
06
Amazon UK · DEXITR wax carving tools
Exact product page, model or ISBN, observed price and availability checked for this guide.
Open source -
07
Amazon UK · Stonebriar white pillar candles
Exact product page, model or ISBN, observed price and availability checked for this guide.
Open source -
08
Amazon UK · Stainless wax carving tools
Exact product page, model or ISBN, observed price and availability checked for this guide.
Open source
Guide information and links checked 13 August 2026.