Beginner’s guide · Make & create
Cross the cords,
keep the order visible.
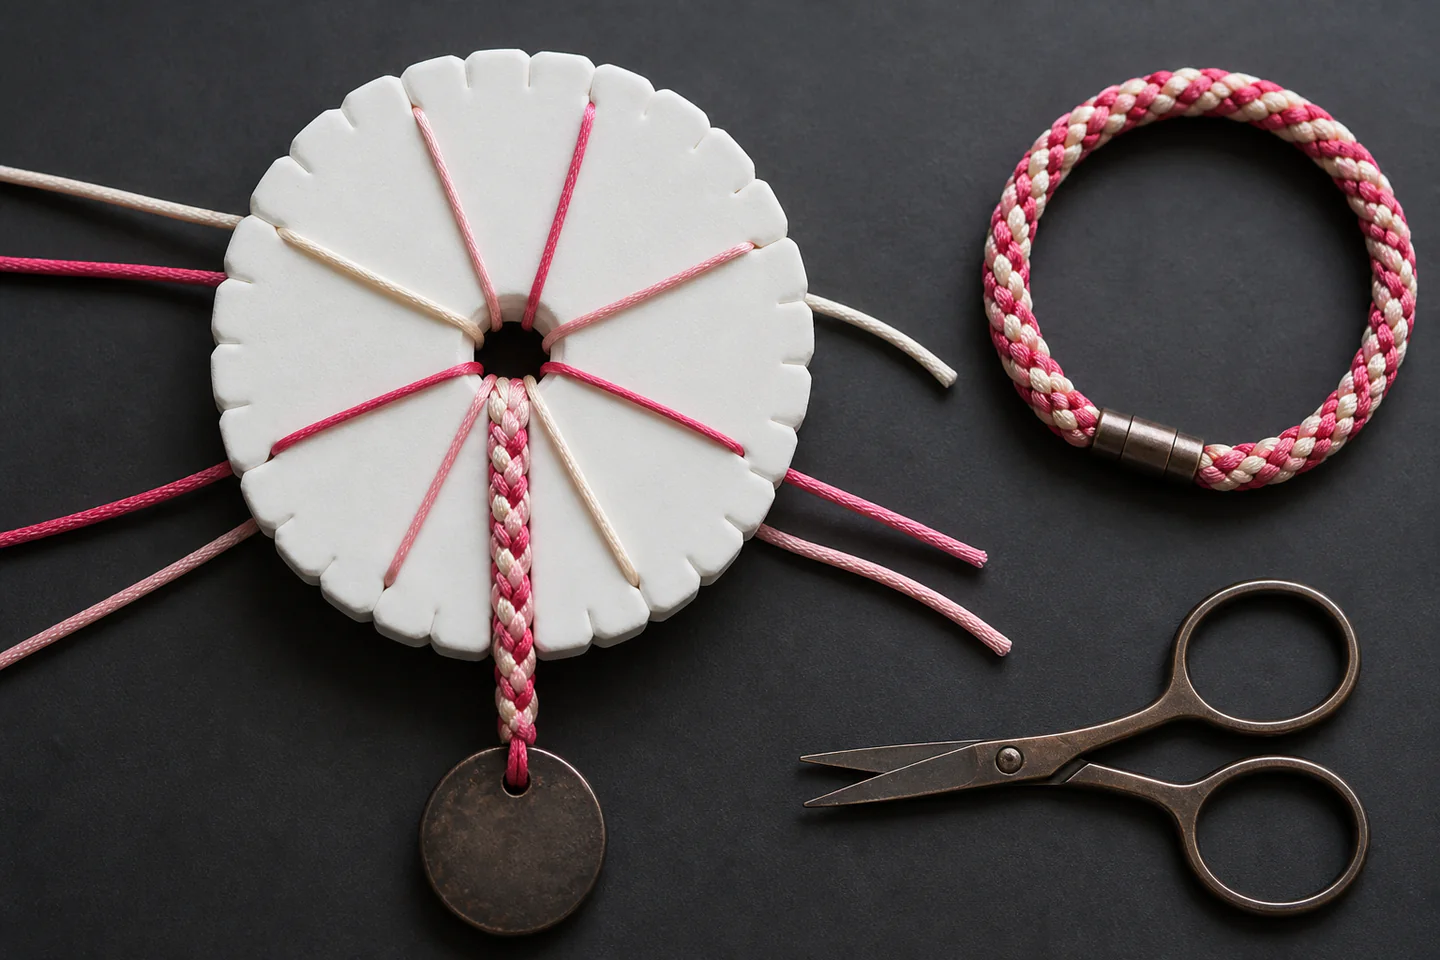
Start on a foam disc with eight contrasting cords. A simple repeated move teaches tension and sequence before extra strands, beads or a wooden marudai add complexity.
Quick answer
Use two colours and one eight-cord sequence
Cut four cords in each of two colours, fold them through the centre of a round foam disc and arrange the eight ends in opposing pairs. Move the bottom-left cord to the upper-left empty slot, then the top-right cord to the lower-right empty slot; rotate the disc and repeat the same action. Work slowly enough to confirm the empty slots after every pair of moves, then finish the first braid before adding findings.
- 01
Use sharply contrasting colours so a misplaced cord is easy to identify. Record what you used on the first attempt so the result can be repeated or changed for a reason.
- 02
Keep the forming braid centred in the disc opening and let it hang without twisting. Record what you used on the first attempt so the result can be repeated or changed for a reason.
- 03
Pull each moved cord into its slot with the same gentle resistance. Record what you used on the first attempt so the result can be repeated or changed for a reason.
- 04
Stop at a known position and clip the active cords before putting the work away. Record what you used on the first attempt so the result can be repeated or changed for a reason.
- 05
Measure finished length under the same light tension rather than stretching the braid. Record what you used on the first attempt so the result can be repeated or changed for a reason.
What to expect
The pattern is simple; losing the place causes most mistakes
Kumihimo becomes rhythmic quickly, but the rhythm is useful only while the starting layout, move order and tension remain consistent.
Setup
An incorrect colour layout produces a different pattern even when every later move is correct. Photograph the disc before beginning. In kumihimo braiding, this is worth checking deliberately rather than trying to correct it after the next stage.
Tension
Loose first centimetres and tight later work make a visibly uneven braid. A small counterweight can help after the basic hand tension is understood. In kumihimo braiding, this is worth checking deliberately rather than trying to correct it after the next stage.
Cord
Satin rat-tail cord gives a clear glossy braid; embroidery thread makes a finer result and is easier to tangle. In kumihimo braiding, this is worth checking deliberately rather than trying to correct it after the next stage.
Length
Braiding shortens the cords substantially. Begin with a pattern’s allowance and keep notes rather than guessing from finished length. In kumihimo braiding, this is worth checking deliberately rather than trying to correct it after the next stage.
Finishing
End caps need the correct internal diameter and adhesive or crimp method. A secure practice knot is enough before buying jewellery findings. In kumihimo braiding, this is worth checking deliberately rather than trying to correct it after the next stage.
Core method
Make the sequence impossible to misread
Prepare equal cords
Measure from one reference cord, cut cleanly and knot the bundle temporarily so no strand pulls through the centre. In kumihimo braiding, this is worth checking deliberately rather than trying to correct it after the next stage.
Lay out the colours
Place cords in the numbered slots specified by one beginner pattern and leave the working gaps clearly visible. In kumihimo braiding, this is worth checking deliberately rather than trying to correct it after the next stage.
Move in pairs
Complete both parts of the move, rotate in one direction and say the next empty-slot check aloud until it becomes automatic. In kumihimo braiding, this is worth checking deliberately rather than trying to correct it after the next stage.
Finish without unravelling
Bind the braid below the disc, remove it as one bundle and use the chosen knot, crimp or end-cap method only after a pull test. In kumihimo braiding, this is worth checking deliberately rather than trying to correct it after the next stage.
Useful products
Products with a clear job in the setup
The WEBEEDY set is the broad one-box route. The plain two-disc pack suits someone who already owns cord, while the disc-and-cord set is a smaller controlled alternative. Choose one starting route.
WEBEEDY Kumihimo Starter Kit with Four Discs and 24 Cord Colours
Multiple disc shapes allow progression while the round disc supports the first eight-cord braid.
Generic Two Round Kumihimo Braiding Discs
It is the least complicated equipment route and one disc can preserve a second project.
Generic Kumihimo Disc Set with Eight Colours of Cord
The limited selection encourages finishing one braid before expanding supplies.
First project
Braid one two-colour cord
A 15 cm sample is long enough to expose lost sequence and changing tension without making a full bracelet depend on the first attempt.
- 01
Cut eight ends
Prepare four ends of each colour to the pattern length and tie them into one temporary overhand knot. In kumihimo braiding, this is worth checking deliberately rather than trying to correct it after the next stage.
- 02
Load the disc
Pass the knot through the centre and place opposing colour pairs in the marked slots. In kumihimo braiding, this is worth checking deliberately rather than trying to correct it after the next stage.
- 03
Make ten slow repeats
Move the two prescribed cords, rotate and verify the empty slots before beginning again. In kumihimo braiding, this is worth checking deliberately rather than trying to correct it after the next stage.
- 04
Inspect the emerging braid
Look below the disc for colour order and feel the diameter for loose sections. In kumihimo braiding, this is worth checking deliberately rather than trying to correct it after the next stage.
- 05
Continue to the mark
Measure without stretching and stop at the same disc orientation used at the start. In kumihimo braiding, this is worth checking deliberately rather than trying to correct it after the next stage.
- 06
Bind and test
Wrap the loose ends firmly, remove the braid and pull-test the finish before trimming. In kumihimo braiding, this is worth checking deliberately rather than trying to correct it after the next stage.
What can wait
What can wait until the first result
Extra pattern families are enjoyable later, but they hide whether the basic disc sequence and tension are dependable.
- 01
More than eight cords
More slots increase the cost of losing the sequence before the simple move is automatic. In kumihimo braiding, this is worth checking deliberately rather than trying to correct it after the next stage.
- 02
Beaded kumihimo
Bead order, loading and weight add a second pattern system. In kumihimo braiding, this is worth checking deliberately rather than trying to correct it after the next stage.
- 03
Square disc patterns
They use different moves and produce flat braids; finish the round sample first. In kumihimo braiding, this is worth checking deliberately rather than trying to correct it after the next stage.
- 04
Wooden marudai stand
Traditional equipment gives excellent control but is not necessary to test the hobby. In kumihimo braiding, this is worth checking deliberately rather than trying to correct it after the next stage.
- 05
Large findings collection
Buy caps and clasps only after the preferred braid diameter is known. In kumihimo braiding, this is worth checking deliberately rather than trying to correct it after the next stage.
Upgrade path
Upgrade the repeated limitation
Upgrade when a repeated braid exposes a specific problem with scale, weight or finishing.
First sample
About £8–£15Round foam disc and two cord colours
Learn the move order.Wearable braid
About £15–£35Measured cord and matched findings
Finish a useful bracelet.Beaded design
About £30–£80Beads, bobbins and pattern
Combine braid and bead order.Traditional setup
About £100–£350+Marudai, weighted bobbins and tama
Control longer complex braids.Safety & care
Manage long cords and small findings
The handwork is low risk, but loose cords, sharp scissors, adhesives and tiny metal components still need an orderly workspace.
- Keep long cords out of walkways and away from pets, young children, fans and flames. Follow the current instructions supplied with the exact material, tool or living specimen.
- Cut on a stable surface and store scissors closed when both hands return to the disc. Follow the current instructions supplied with the exact material, tool or living specimen.
- Ventilate and follow the label if an adhesive is used in end caps. Follow the current instructions supplied with the exact material, tool or living specimen.
- Check clasps, crimps and end caps with a pull test before wearing or gifting. Follow the current instructions supplied with the exact material, tool or living specimen.
- Treat beads, caps and wire pieces as choking hazards and collect dropped parts promptly. Follow the current instructions supplied with the exact material, tool or living specimen.
Outside help
When outside help earns its place
A well-made tutorial is enough for the first controlled result. In-person help becomes worthwhile when bead loading, many-strand patterns or traditional weighted equipment becomes the obstacle.
Use one complete method from start to finish instead of combining several creators’ measurements.
Ask whether materials, preparation, troubleshooting and a securely finished braid are included.
Representative UK learning options checked 28 August 2026; local prices, access, materials and tutor support vary.
Sources
Where the guidance came from
The method is grounded in specialist and public guidance, then checked against recurring beginner questions and the exact products linked here.
-
01
Japan House London · kumihimo
Cultural and technical context for Japanese braiding.
Open source -
02
Victoria and Albert Museum · Japanese textiles
Museum context for Japanese textile practice.
Open source -
03
Kumihimo Resource · basics
Disc setup, cord movement and pattern guidance.
Open source -
04
Reddit · r/kumihimo
Community evidence on tension, cord choices and finishing.
Open source -
05
Craft Yarn Council · standards
Shared terminology for fibre and yarn scale.
Open source -
06
Amazon UK · Kumihimo Starter Kit with Four Discs and 24 Cord Colours
Exact product catalogue page or ISBN used for the recommendation; current price, seller, specification and availability should be confirmed.
Open source -
07
Amazon UK · Two Round Kumihimo Braiding Discs
Exact product catalogue page or ISBN used for the recommendation; current price, seller, specification and availability should be confirmed.
Open source -
08
Amazon UK · Kumihimo Disc Set with Eight Colours of Cord
Exact product catalogue page or ISBN used for the recommendation; current price, seller, specification and availability should be confirmed.
Open source
Guide information and links checked 28 August 2026.