Beginner's guide · Make & build
Build one ruined wall.
Make it read at arm's length.
Start with card or foamboard, grit, PVA and inexpensive paint. A small ruined wall teaches structure, texture, basing and drybrushing without committing to a full gaming table or a hot-wire cutter.
Quick answer
Build one ruined wall.
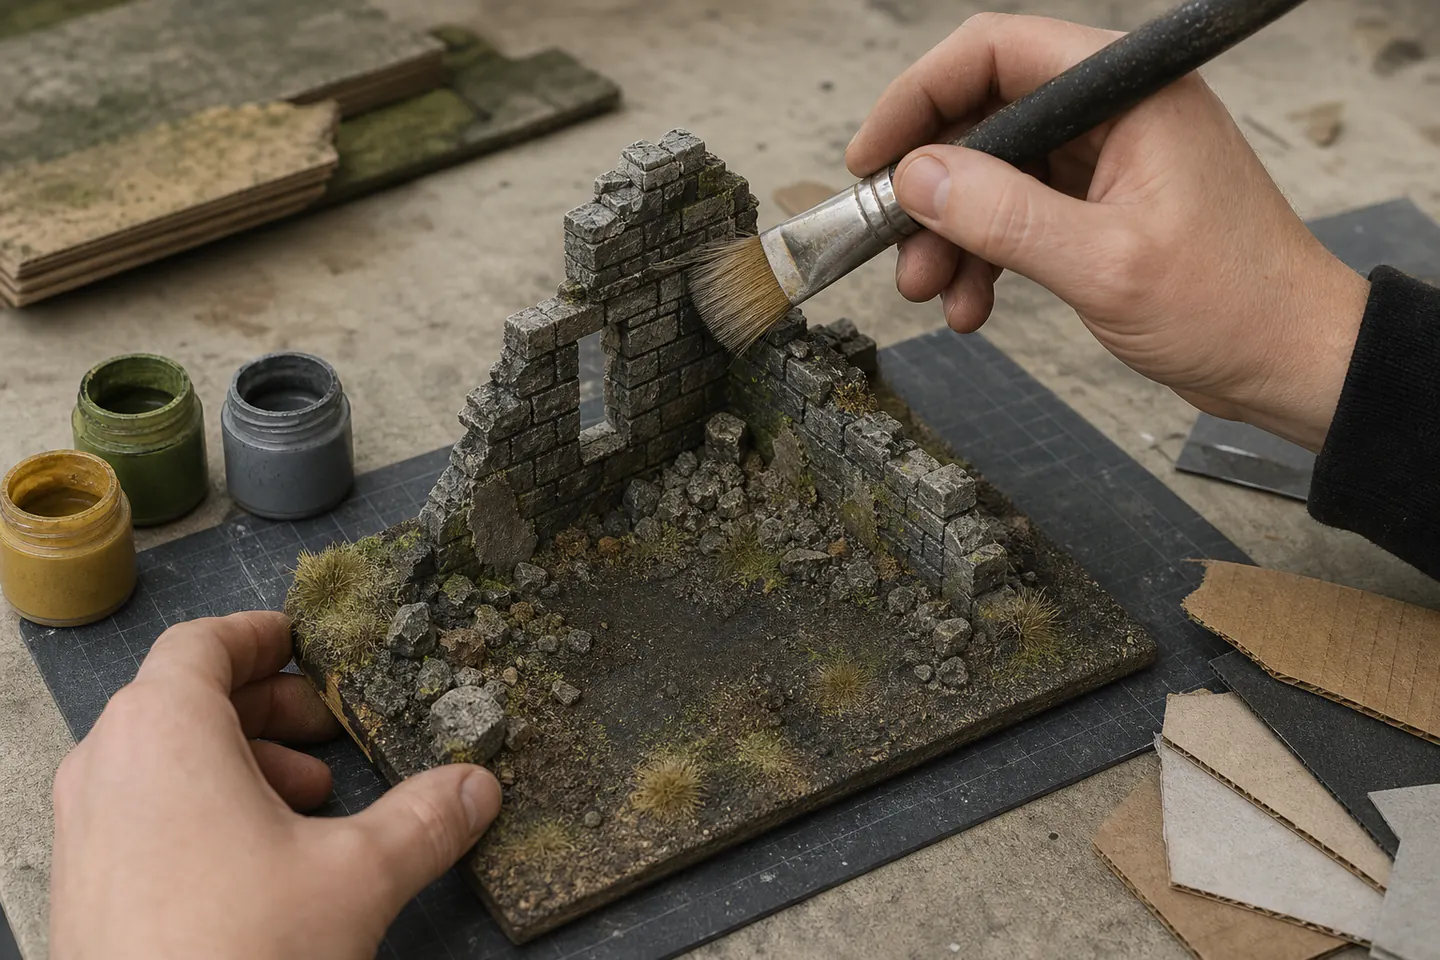
Cut a short L-shaped wall from corrugated card or foamboard, glue it to a broad card base, cover exposed corrugations, add a restrained mix of sand and small stones, then paint from a dark base colour to two progressively lighter drybrush passes.
- 01
A small freestanding ruin teaches the whole terrain cycle and can be used in many games without needing exact rules or a permanent board.
- 02
Cheap household or student acrylics are enough for large surfaces. Model paints become useful for controlled colours and smaller details.
- 03
PVA joins porous card and scenery texture; plastic or resin parts may need a different compatible adhesive.
- 04
Skip the hot-wire cutter and aerosol-heavy workflow at first. A knife, mat and ventilated brush painting route is easier to control.
What to expect
What the first attempts really involve
The first project is useful because it exposes the decisions that shopping pages tend to hide.
Scale
Terrain must work beside the models and rules being used. Door height, wall thickness and base footprint matter more than tiny surface detail.
Silhouette
From across a table, broken corners and varied wall height read before individual bricks. Design the outline before adding texture.
Durability
Players pick scenery up by its weakest-looking edge. Broad bases, reinforced corners and sealed texture survive handling better than fragile realism.
Paint consumption
Terrain uses far more paint than a miniature. Large inexpensive acrylics handle base coverage; smaller model colours are best reserved for accents.
Storage
A table's worth of scenery becomes a volume problem. Stackable footprints and removable scatter pieces are a design feature, not an afterthought.
Plan the ruin
Make the structure readable before adding texture
Start with the game footprint
Place two representative miniatures beside a paper rectangle. Check that figures can stand where the rules expect them to stand and that hands can reach them without catching the scenery. A 12–18 cm wall run on a base only slightly deeper is enough for a first project.
Build a strong L
Two walls joined at a right angle support each other. Laminate card where an edge feels flexible and cap exposed corrugations with thin paper or card strips. Add a triangular internal brace if it can be hidden as rubble. Let structural glue dry before covering it.
Use texture selectively
Spread PVA on the base and apply a mix of fine sand plus a few larger fragments. Keep model standing areas fairly flat. Texture paste and commercial basing mixes are convenient, but the visual lesson is variation in size and placement rather than maximum coverage.
Starter products
A texture sampler, a protected cutting surface and durable paint
The basing set offers several textures in small quantities, the A4 mat protects a compact workspace and the Vallejo set supplies dependable colours for repeated small projects. Large boards will still be cheaper to cover with ordinary craft paint and bulk scenery material.
The Army Painter Battlefield Basing Set
It makes fine ground, larger rubble and a few vegetation accents available for one or several compact pieces.
The Army Painter Self-Healing A4 Cutting Mat
The grid helps square compact walls and bases while the self-healing surface is kinder to blades than a household tabletop.
First project
Build and paint one freestanding ruin
Use dimensions that fit the intended game, then keep the material list small enough that the effect of every step remains visible.
- 01
Sketch the footprint
Mark the base, two wall runs and any doorway. Stand a model beside the sketch to check scale and playing clearance.
- 02
Cut the walls safely
Use several light knife passes against a metal ruler on the mat. Keep the supporting hand behind the cutting line.
- 03
Join and brace
Glue the L-shape square, add a hidden brace and let it dry. Cover corrugated edges before surface texture is applied.
- 04
Texture the base
Brush PVA onto selected areas, sprinkle fine material and place a few larger stones. Leave flat places for models and fingers.
- 05
Seal and basecoat
When completely dry, seal loose grit with diluted compatible PVA if needed. Brush on a dark matte base colour without flooding the card.
- 06
Drybrush in two steps
Remove most paint from a broad brush, catch raised texture with a mid-tone, then use a smaller amount of a lighter colour on upper edges.
- 07
Add restrained vegetation
Place a few tufts where moisture or sheltered soil would collect. Shake off loose material and test the piece in play before adding more.
Troubleshooting
A convincing ruin is mostly controlled contrast
Warped card held too much water
Use less diluted glue and paint on broad card surfaces, work both sides when appropriate and let pieces dry flat under a protected light weight. Foamboard or laminated card helps when a single sheet remains flexible.
Drybrushing looks chalky
Too much pale paint or pressure can cover rather than catch the texture. Return with a thin dark glaze into recesses, let it dry, then drybrush with less paint. Test each loaded brush on scrap texture before touching the model.
The base sheds grit
Loose material usually lacked glue underneath or was handled before curing. Remove unstable pieces, reapply PVA and let it dry fully. A careful sealing layer can help, but spraying unknown foam and adhesive combinations may melt material or trap fumes.
Skip for now
What can wait
Terrain videos often show an equipped workshop. Most of those tools become useful only after the preferred materials and project size are known.
- 01
A hot-wire foam cutter
It speeds repeated XPS shaping but introduces fumes, heat and material-compatibility concerns. Knife-cut card or foamboard is enough for a first ruin.
- 02
Large bags of one texture
A sampler reveals whether grass, snow, cork or gravel suits the table. Bulk supplies become economical after the visual language is chosen.
- 03
An airbrush
Airbrushes create fast gradients but add ventilation, cleaning, compressor noise and masking. Brush basecoats and drybrushing teach the same value structure.
- 04
A full modular board
Tiles magnify alignment, storage and warping problems. Several independent scatter pieces can transform a plain mat with much less commitment.
- 05
Resin water and specialist effects
Gloss liquids and deep pours require sealing, levelling and chemical handling. Paint a shallow puddle before attempting cast water.
Upgrade path
What a better setup changes
Upgrade when a repeatable bottleneck appears: stronger sheet material, faster texture, broader paint coverage or a genuinely modular table.
One card ruin
About £20–£50Card + PVA + grit + acrylic paint
Learn scale, silhouette, texture and drybrushing.Durable scatter set
About £40–£100Foamboard or XPS + bulk texture + sealing system
Build several compatible pieces with repeatable colour and footprint.Faster large coverage
About £100–£250Airbrush + compressor + booth or suitable extraction
Apply controlled gradients and base layers quickly after safe setup and cleaning become routine.Modular table
About £150–£500+Planned tiles + storage + durable finish
Create a cohesive battlefield at the cost of much more space, alignment work and handling.Safety
Work safely from the first attempt
Cutting, dust and aerosols are the meaningful risks. Treat found sand, foam and pigments as materials that need controlled handling.
- Cut with several light passes on a stable mat, keep fingers behind the ruler edge and store blades safely.
- Do not heat or burn unknown foam. Hot-wire cutting requires the ventilation and material guidance specified by the tool and foam maker.
- Avoid creating airborne dust from plaster, filler, sand or pigments; work damp where possible and clean with a suitable vacuum or damp method.
- Use aerosol primers and solvent products only with the ventilation, respirator and fire precautions stated on their labels.
- Seal natural sand or soil only after checking it is clean, dry and legal to collect; commercial hobby material avoids many contaminants.
- Keep scenic powders, sharp offcuts and small stones away from children and pets.
Classes
When outside help is useful
A class is unnecessary for the first wall. It becomes useful for hot-wire technique, airbrushing or building to a club's established scale and storage system.
Choose a complete start-to-finish build that names materials and shows drying time rather than only the finished reveal.
Useful for matching the club's scale and trying shared texture supplies without buying bulk bags.
Worth considering when ventilation, tool cleaning and material safety are part of the teaching.
Representative UK model-making and game-store sessions checked 27 July 2026; local club events change frequently.
Sources
Sources and checking notes
Terrain-builder discussions support the inexpensive card, PVA and craft-paint route. Manufacturer documentation supplied exact tool and paint specifications, while safety guidance shaped the dust, blade and aerosol limits.
-
01
r/TerrainBuilding · Starter tools and materials
Beginner discussion favouring PVA, card or foamcore, cheap acrylics and simple hand tools before a hot-wire cutter.
Open source -
02
r/Warhammer40k · Battlefield Basing Set experience
Community feedback that the set offers useful variety but relatively small quantities.
Open source -
03
r/Warhammer · Starting with basing materials
Practitioner comparison between small hobby kits and cheaper bulk scenery supplies.
Open source -
04
r/Warhammer40k · Beginner painting tools
Community advice that inexpensive brushes are sufficient for broad terrain work.
Open source -
05
The Army Painter · Self-healing cutting mat
Manufacturer dimensions and double-sided self-healing mat description.
Open source -
06
Vallejo · Basic Colors USA set
Manufacturer list for the sixteen 17 ml acrylic colours in the selected set.
Open source -
07
HSE · Woodworking and furniture dust
General UK workplace guidance reinforcing control of inhalable craft and wood dust.
Open source -
08
Amazon UK · Army Painter Battlefield Basing Set
Exact multi-texture basing starter set selected for a compact first project.
Open source -
09
Amazon UK · Army Painter A4 cutting mat
Exact compact self-healing cutting surface selected for card work.
Open source -
10
Amazon UK · Vallejo Basic Colors USA
Exact sixteen-colour acrylic model-paint set selected for repeated small scenery projects.
Open source
Guide information and links checked 27 July 2026.