Beginner’s guide · Make & create
Layer narrow strips,
leave one clean centre.
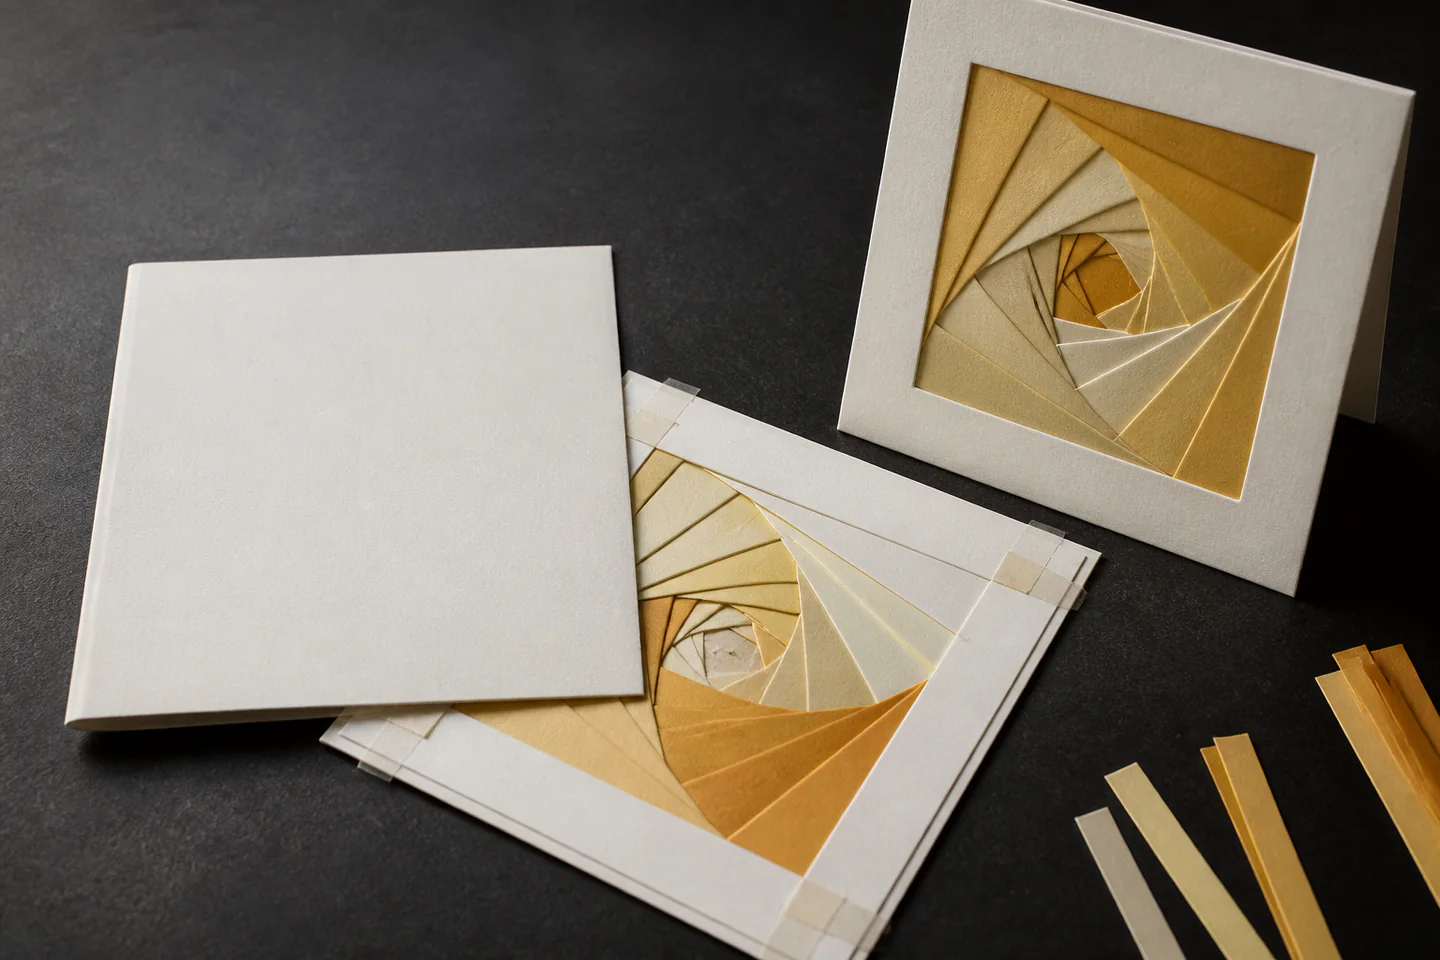
Iris folding builds a spiralling paper window from numbered strips. A card kit or clear template teaches alignment before custom apertures and complex colour plans.
Quick answer
Use a pre-cut kit for the first numbered spiral
Place a pre-cut card aperture face down over a numbered iris template and secure only the outer edges with low-tack tape. Prepare thin paper strips, fold one long edge of each for a clean line and place them in numerical order with the fold facing the opening. Tape only the ends outside the aperture, keep the centre clear and cover the back neatly before turning the card over.
- 01
Choose thin coloured paper strips and a tested template for the first result and resist substituting several unfamiliar materials at once. Record what you used on the first attempt so the result can be repeated or changed for a reason.
- 02
Make number order and strip alignment visible with a small test before committing the full project. Record what you used on the first attempt so the result can be repeated or changed for a reason.
- 03
Change one variable between attempts and keep the preparation otherwise consistent. Record what you used on the first attempt so the result can be repeated or changed for a reason.
- 04
Inspect the work at each reversible stage instead of waiting until backing and card closure. Record what you used on the first attempt so the result can be repeated or changed for a reason.
- 05
Finish one modest result and note the actual time, material use and recurring difficulty. Record what you used on the first attempt so the result can be repeated or changed for a reason.
What to expect
The front is created while working from the back
Iris folding is forgiving when the template stays fixed, but reversed orientation, thick paper and excess tape quickly make a lumpy card.
Sequence
One skipped number changes the overlap and can expose raw edges at the front. In iris folding, this is worth checking deliberately rather than trying to correct it after the next stage.
Thickness
Every strip adds a layer. Lightweight paper keeps the card foldable and postage practical. In iris folding, this is worth checking deliberately rather than trying to correct it after the next stage.
Colour
A four-colour repeat is easier to track than many similar tones. Sort strips before starting. In iris folding, this is worth checking deliberately rather than trying to correct it after the next stage.
Adhesive
Tape belongs outside the visible aperture and should not cross the card fold. In iris folding, this is worth checking deliberately rather than trying to correct it after the next stage.
Centre
The final opening can be covered with one contrasting piece, but only after the spiral remains even. In iris folding, this is worth checking deliberately rather than trying to correct it after the next stage.
Core method
Keep the template fixed and the layers thin
Prepare the aperture
Use a tested card shape, remove rough cut edges and align it exactly over the printed template. In iris folding, this is worth checking deliberately rather than trying to correct it after the next stage.
Fold and sort strips
Cut consistent widths, fold one edge and group colours in the order the pattern expects. In iris folding, this is worth checking deliberately rather than trying to correct it after the next stage.
Work numerically
Place the folded edge on each numbered line, secure the ends and check the front periodically without shifting the card. In iris folding, this is worth checking deliberately rather than trying to correct it after the next stage.
Back the construction
Trim only safe excess, cover exposed tape and close the card without compressing the iris. In iris folding, this is worth checking deliberately rather than trying to correct it after the next stage.
Useful products
Products with a clear job in the setup
The DeeCraft kit is the easiest contained first project. The dedicated paper pack supplies thin coordinated strips, and the pattern book is the useful next step for more apertures.
DeeCraft Champagne Flute Iris Folding Card Kit
Four repeats allow sequence and neatness to improve without sourcing separate card.
Generic Iris Folding Papers Pack
Purpose-selected paper is easier to fold and layer than thick general card.
Maruscha Gaasenbeek Elegant Iris Folding
Published templates preserve the overlap geometry while colour choices remain personal.
First project
Make one four-colour aperture card
A broad simple shape and repeating palette expose sequence errors without delicate points.
- 01
Mount the template
Tape the card face down over the correct-size pattern without covering the aperture. In iris folding, this is worth checking deliberately rather than trying to correct it after the next stage.
- 02
Prepare four strip piles
Cut equal widths, fold one clean edge and arrange colours in repeat order. In iris folding, this is worth checking deliberately rather than trying to correct it after the next stage.
- 03
Place the first circuit
Follow each number and secure only the ends beyond the visible opening. In iris folding, this is worth checking deliberately rather than trying to correct it after the next stage.
- 04
Check from the front
Turn the sandwich carefully and correct drift before many layers cover it. In iris folding, this is worth checking deliberately rather than trying to correct it after the next stage.
- 05
Close the centre
Add the prescribed centre piece once the remaining window is even. In iris folding, this is worth checking deliberately rather than trying to correct it after the next stage.
- 06
Cover the back
Trim safe excess, add a backing panel and confirm the card closes flat. In iris folding, this is worth checking deliberately rather than trying to correct it after the next stage.
What can wait
What can wait until the first result
Custom aperture engineering can wait until the first card proves the sequence, paper weight and adhesive choice.
- 01
Intricate pointed aperture
Narrow corners expose alignment errors and tearing. In iris folding, this is worth checking deliberately rather than trying to correct it after the next stage.
- 02
Heavy scrapbook card strips
The overlapping stack becomes too thick to close neatly. In iris folding, this is worth checking deliberately rather than trying to correct it after the next stage.
- 03
Many similar colours
They make the repeating sequence needlessly hard to audit. In iris folding, this is worth checking deliberately rather than trying to correct it after the next stage.
- 04
Permanent wet glue
Moisture can buckle paper and removes the chance to reposition. In iris folding, this is worth checking deliberately rather than trying to correct it after the next stage.
- 05
Original numbered template
The spiral geometry is easier to understand after several proven patterns. In iris folding, this is worth checking deliberately rather than trying to correct it after the next stage.
Upgrade path
Upgrade the repeated limitation
Add design freedom when the back is already orderly and the finished card stays flat.
Kit card
About £8–£18Pre-cut aperture and strips
Learn numerical layering.Pattern-book cards
About £15–£35Paper pack, card blanks and tape
Choose palettes and shapes.Custom aperture
About £25–£70Knife, mat and design template
Control cutting and geometry.Small card range
About £60–£200+Repeatable templates and paper storage
Produce consistent finished cards.Safety & care
Separate knife work from strip assembly
The folding itself is simple; cutting card apertures introduces sharp tools and accumulated paper thickness affects postage and display.
- Use pre-cut cards for the first project or cut apertures on a mat with fingers outside the blade path. Follow the current instructions supplied with the exact material, tool or living specimen.
- Cap craft knives immediately after use and contain spent blades. Follow the current instructions supplied with the exact material, tool or living specimen.
- Use low-odour adhesives as directed and ventilate if sprays or solvents are introduced. Follow the current instructions supplied with the exact material, tool or living specimen.
- Keep tape off skin and hair and store small embellishments away from children. Follow the current instructions supplied with the exact material, tool or living specimen.
- Check finished card thickness and rigid decorations before posting. Follow the current instructions supplied with the exact material, tool or living specimen.
Outside help
When outside help earns its place
A complete beginner tutorial is enough for the first controlled attempt. A class becomes useful when custom apertures or original template geometry becomes the goal.
Follow one method using thin coloured paper strips and a tested template, including preparation and finishing rather than only the photogenic middle stage.
Check whether materials, troubleshooting, backing and card closure and a finished take-home result are included.
Representative UK learning options checked 28 August 2026; local prices, access, materials and tutor support vary.
Sources
Where the guidance came from
The method is grounded in specialist and public guidance, then checked against recurring beginner questions and the exact products linked here.
-
01
British Origami Society
UK paper-folding community and learning resources.
Open source -
02
Victoria and Albert Museum · paper collection
Material and historical context for paper arts.
Open source -
03
Library of Congress · paper permanence
Paper handling and preservation context.
Open source -
04
Paper Kawaii · tutorials
Specialist folding and paper-project tutorials.
Open source -
05
Reddit · r/papercraft
Community evidence on paper, tools and common failures.
Open source -
06
Amazon UK · Champagne Flute Iris Folding Card Kit
Exact product catalogue page or ISBN used for the recommendation; current price, seller, specification and availability should be confirmed.
Open source -
07
Amazon UK · Iris Folding Papers Pack
Exact product catalogue page or ISBN used for the recommendation; current price, seller, specification and availability should be confirmed.
Open source -
08
Amazon UK · Elegant Iris Folding
Exact product catalogue page or ISBN used for the recommendation; current price, seller, specification and availability should be confirmed.
Open source
Guide information and links checked 28 August 2026.